
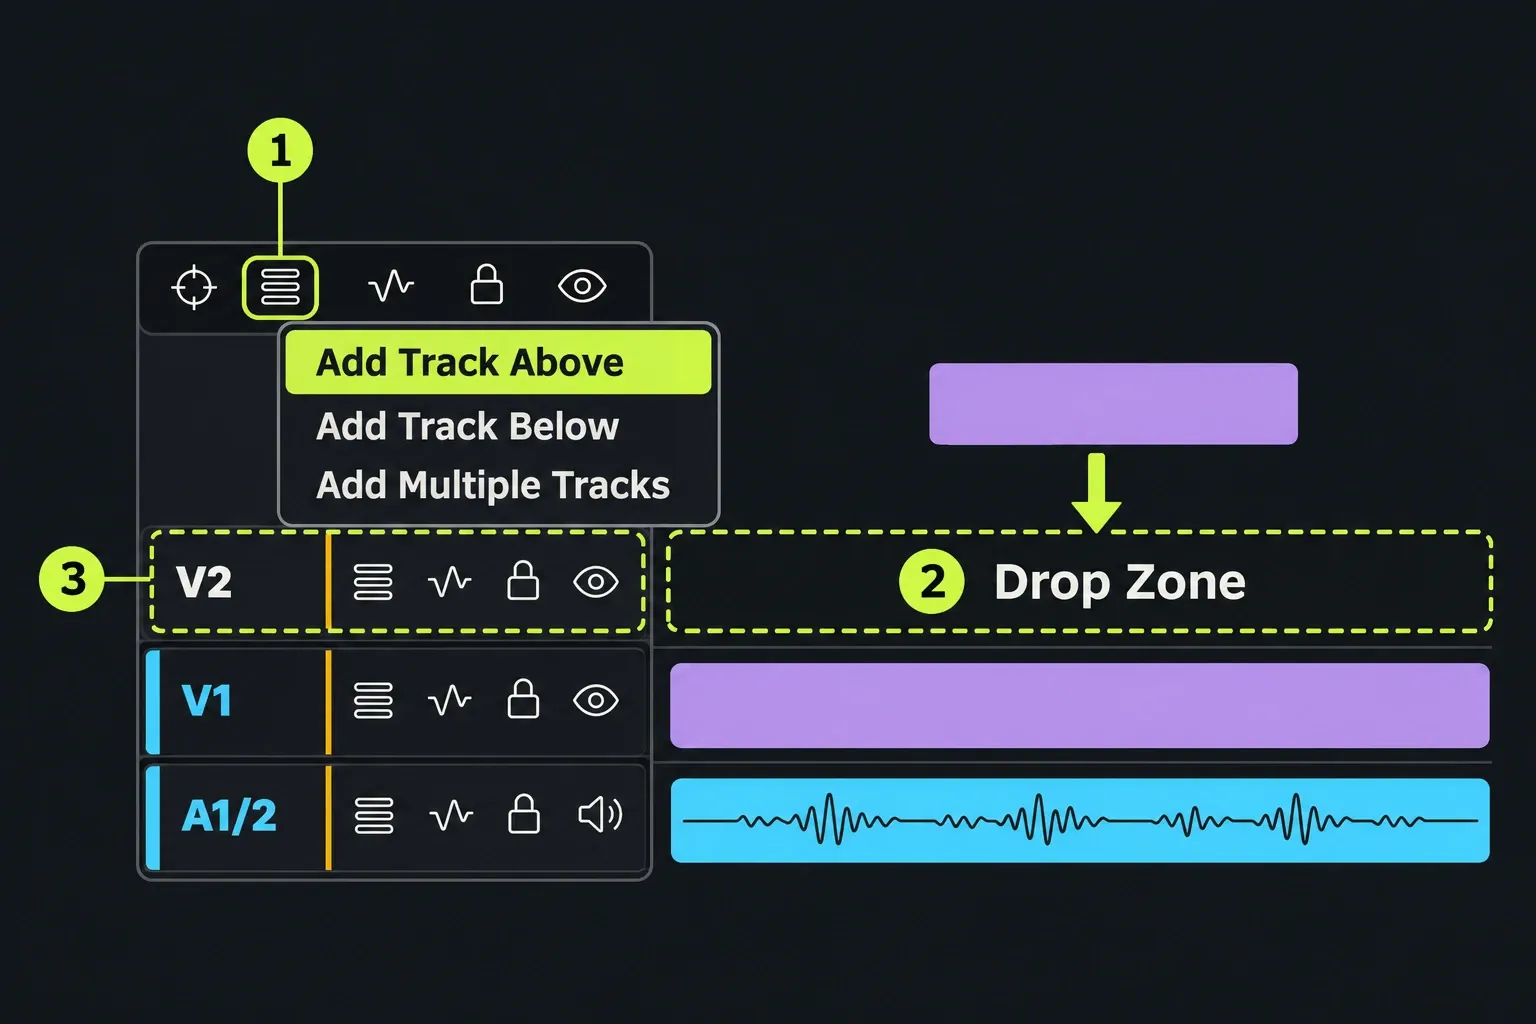
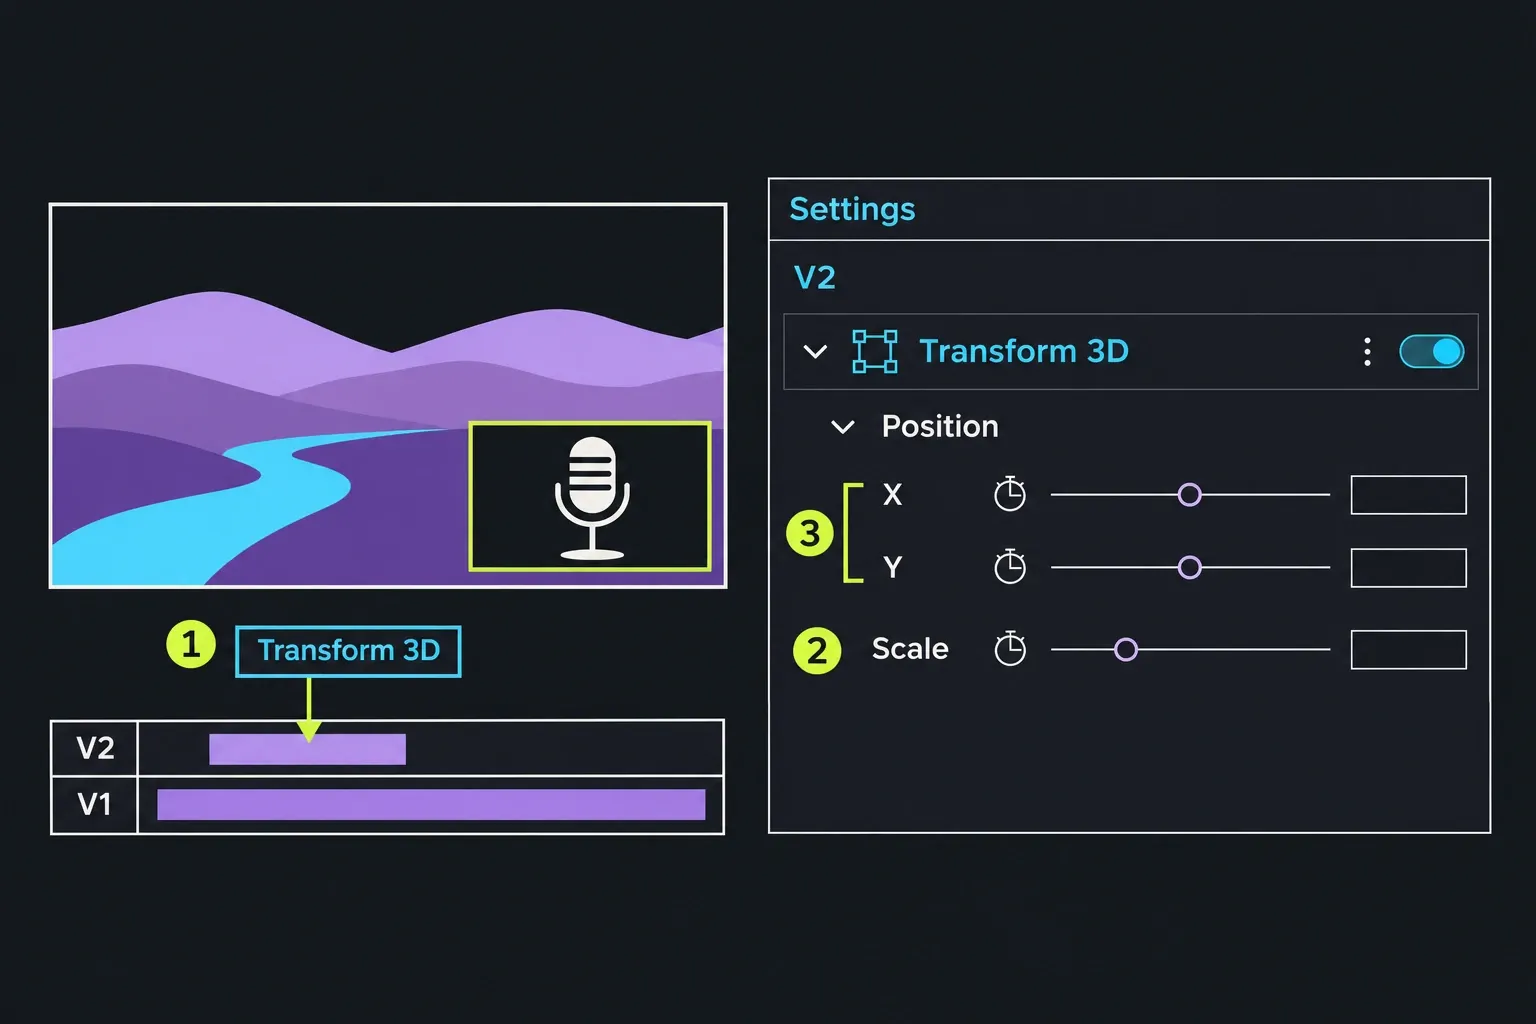
To put a second video over your main shot in Lightworks 2026.1, open the Track Options menu above the track headers and choose Add Track Above, or drag the clip into the Drop Zone above your top video track and Lightworks makes the new track for you. Anything on V2 covers V1, so a full-size clip there simply hides your footage. For a picture in picture, drag Transform 3D onto the V2 clip, bring Scale down from 1 to about 0.3 and move Position X and Y until the inset sits in a corner. Side by side and grid layouts work the same way: one clip per track, each scaled or cropped and positioned so they tile. For a clip filmed against a green or blue backdrop, follow the green-screen workflow to remove the backdrop and check the subject's edges.
I'd place the overlay with Replace rather than Insert, because an insert pads every other track with black and pushes the rest of your edit later, while a replace keeps the sequence exactly the same length. And I'd build every layout with Transform 3D, the default transform in 2026.1, rather than following the DVE presets in older tutorials, because the DVE was renamed Transform years ago and Transform 3D now combines everything the older 2D and 3D versions did.
| Task | Where in Lightworks 2026.1 | Starting setting |
|---|---|---|
| Add one video track | Track Options menu, Add Track Above or Add Track Below | New track sits over V1 as V2 |
| Add several tracks | Track Options, Add Multiple Tracks, or drop clips into the Drop Zone | Up to 24 video and 32 audio tracks |
| Place the overlay clip | Target V2, then Replace | Sequence length unchanged |
| Picture in picture | Transform 3D on the V2 clip | Scale 0.3, then Position X and Y |
| Logo or still overlay | Import a PNG with transparency onto V2 | Trim the 60-second still to length |
| Side by side | Transform 3D on each clip, one per track | Crop each to half width, or Scale 0.5 with bars |
| Four-way grid | Four tracks, Transform 3D on each | Scale 0.5, one clip per quarter |
Add another video track
Lightworks stacks video tracks from V1 upwards, and the Knowledge Base page on sequences and timelines spells out the rule every overlay depends on: higher-numbered tracks sit above lower ones, so V2 covers V1. A sequence holds up to 24 video and 32 audio tracks, which is far more than a picture in picture or even a nine-way grid needs.
Lightworks 2026.1 gives you three ways to make the track:
- Track Options menu. It sits above the track headers, with a shorter version on each header. Choose Add Track Above or Add Track Below the track you clicked, or Add Multiple Tracks to make several at once. The same menu moves a track up or down and deletes empty tracks when you tidy up.
- Drop Zone. Drag a clip into the strip above your top video track and Lightworks creates as many tracks as the material needs. The 2026.1 What's New page says this works from outside the timeline and from clips already on it, and one undo removes the new tracks again.
- Auto Add Tracks. With this timeline option on, an edit from the source viewer adds enough tracks to take every source track.
Older forum answers tell you to right-click the timeline and pick Tracks, which matches the builds they were written for. If no add-track command appears at all, check what you have open: in a 2017 forum thread the option was missing because a source clip was loaded in the viewer instead of an edit. If the timeline panel itself has vanished, the guide to a missing Lightworks panel brings it back without resetting your layout.
A 2022 user in the thread on creating more video tracks had to add three tracks to every new project by hand. The fix a regular gave there still saves time: make a new empty sequence from a bin with the track layout you want, and Lightworks remembers that layout for the next one.
Put the clip on V2 without shifting the edit
Where the overlay lands matters more than how it gets there. The Knowledge Base page on basic editing describes the two edits you'll choose between:
- Replace lays the clip over whatever sits at the playhead and keeps the sequence the same length. The page names this exact job: dropping a cutaway onto a higher track.
- Insert pushes everything after the insert point later and pads the other tracks with black to keep them in sync. That's right for adding a new shot to the story and wrong for an overlay.
From the source viewer:
- Load the overlay clip in the source viewer and mark its In and Out points. If you want picture only, enable its source video track and disable its source audio tracks before the edit. Those source track controls decide what gets edited in; the source Monitor buttons only change what you see or hear.
- Park the timeline playhead on the frame where the overlay should start. A Reddit answer about a picture in picture that had to start later in the edit gave the same advice: mark and park.
- Click V2's Track Target so it lights in the accent colour. With nothing targeted, edits use every track, so targeting tells Lightworks exactly where the picture goes.
- Click Replace. If the overlay brought its own sound on a dedicated audio track and you only want the picture, mute that audio track with its Monitor button. Track mute also silences any other material on that track, so use the linked guide's clip-specific route when it also contains dialogue or music you need.
If you drag the clip into place instead and the clips after it slide later, you made an insert. Undo and use Replace. This is the oldest overlay problem on the forum: a 2011 user in the thread on inserting video to a second track got red out-of-sync marks from an insert onto V2, and Replace fixed it. I'd also lock V1 and the dialogue tracks while you work above them, because a locked track takes no edit, trim or cut at all, while an untargeted track still moves to stay in sync.
Make a picture in picture with Transform 3D
A picture in picture is just a smaller V2 clip, so V1 shows around it. The Knowledge Base guide to transform, crop and reframing gives the recipe, and these are the clicks in 2026.1:
- Drag Transform 3D from the Effects browser onto the V2 clip. Dragging puts the effect on exactly that clip. Double-click and Apply follow the track targets instead, landing on the top-most targeted track with a clip under the playhead.
- Open the effect's settings and lower Scale. Scale, X Scale and Y Scale run from 0 to 10, with 1 as normal size.
- Move Position X and Y until the inset sits where you want it. Effects Settings can show values as percentages or pixels, whichever you find easier to read.
- Crop the inset if it carries dead space, and add an edge or shadow if it blends into the background.
For a source that fills a sequence of the same aspect ratio at Scale 1, with no other scaling or crop, Scale changes width and height together. The area covered is then the square of the scale value; the table below uses those conditions:
| Scale | Inset width | Share of the frame covered | Good for |
|---|---|---|---|
| 0.5 | Half the frame | 25% | Reaction shot that matters as much as the main picture |
| 0.33 | A third | About 11% | Commentary or a second camera angle |
| 0.3 | Under a third | 9% | Webcam over a screen recording |
| 0.25 | A quarter | About 6% | Small logo-style inset or a map |
I'd start at 0.3: the inset is still close to a third of the frame wide, and 91% of the main shot stays visible. Go bigger only when the inset carries the story.
To slide the inset in, park the playhead at its first animation frame. In Transform 3D settings, enable the stopwatch beside the Position parameter you want to change and set its starting value with the inset outside the frame. Move a second or so later and set that parameter to its final value. The keyframe guide describes enabling the parameter before setting values at different frames. If you want to adjust the graph on V2, turn on that track's Keyframes button, knowing that it unlocks the track; restore the intended Lock state when finished. Play through the move to check its entry and final position.
The official Short Cuts tutorial on picture in picture from June 2023 uses ready-made DVE picture-in-picture presets from an older build. In 2026.1 the legacy Transform and Framing effects still work where a project already uses them but are no longer offered as new effects, so in a current build Transform 3D is the tool. The forum made the same move years ago: in a 2017 split-screen thread a moderator noted that the DVE was by then called Transform.
Overlay a logo or still picture
A logo, watermark or photo goes on V2 the same way as a clip. The format decides whether you see a clean logo or a box around it. The Knowledge Base page on importing media says images with an alpha channel keep their transparency, which is why it recommends PNG and EXR for logos and overlays. A JPEG has no alpha channel, so it always arrives as a solid rectangle.
- Length. A still imports as a 60-second clip. Change Stills duration in the import options before you import (anything from 1 second up), or trim the still on the timeline.
- Size. Use Transform 3D exactly as for a video inset. A lower Scale keeps a logo crisp, while scaling a small file above 1 softens it.
- Shape of the sequence. The first clip you put into a new sequence sets its format, and the official still-images tutorial notes that a blank sequence takes on the image's aspect ratio. Put your main video in first, then the logo.
- Animated logos. An animated GIF imports as video, motion included.
Text overlays are a different job with their own effects, covered in the guide to Lightworks text and title effects. The import guide helps when a file won't come in at all.
Side by side, split screen and grids
Every picture that shows at the same moment needs its own video track. The Knowledge Base builds a split screen by cropping and positioning each clip on its own track so they tile, and there are two honest ways to fit two 16:9 shots side by side:
| Layout | Tracks | Transform 3D setting | What you get |
|---|---|---|---|
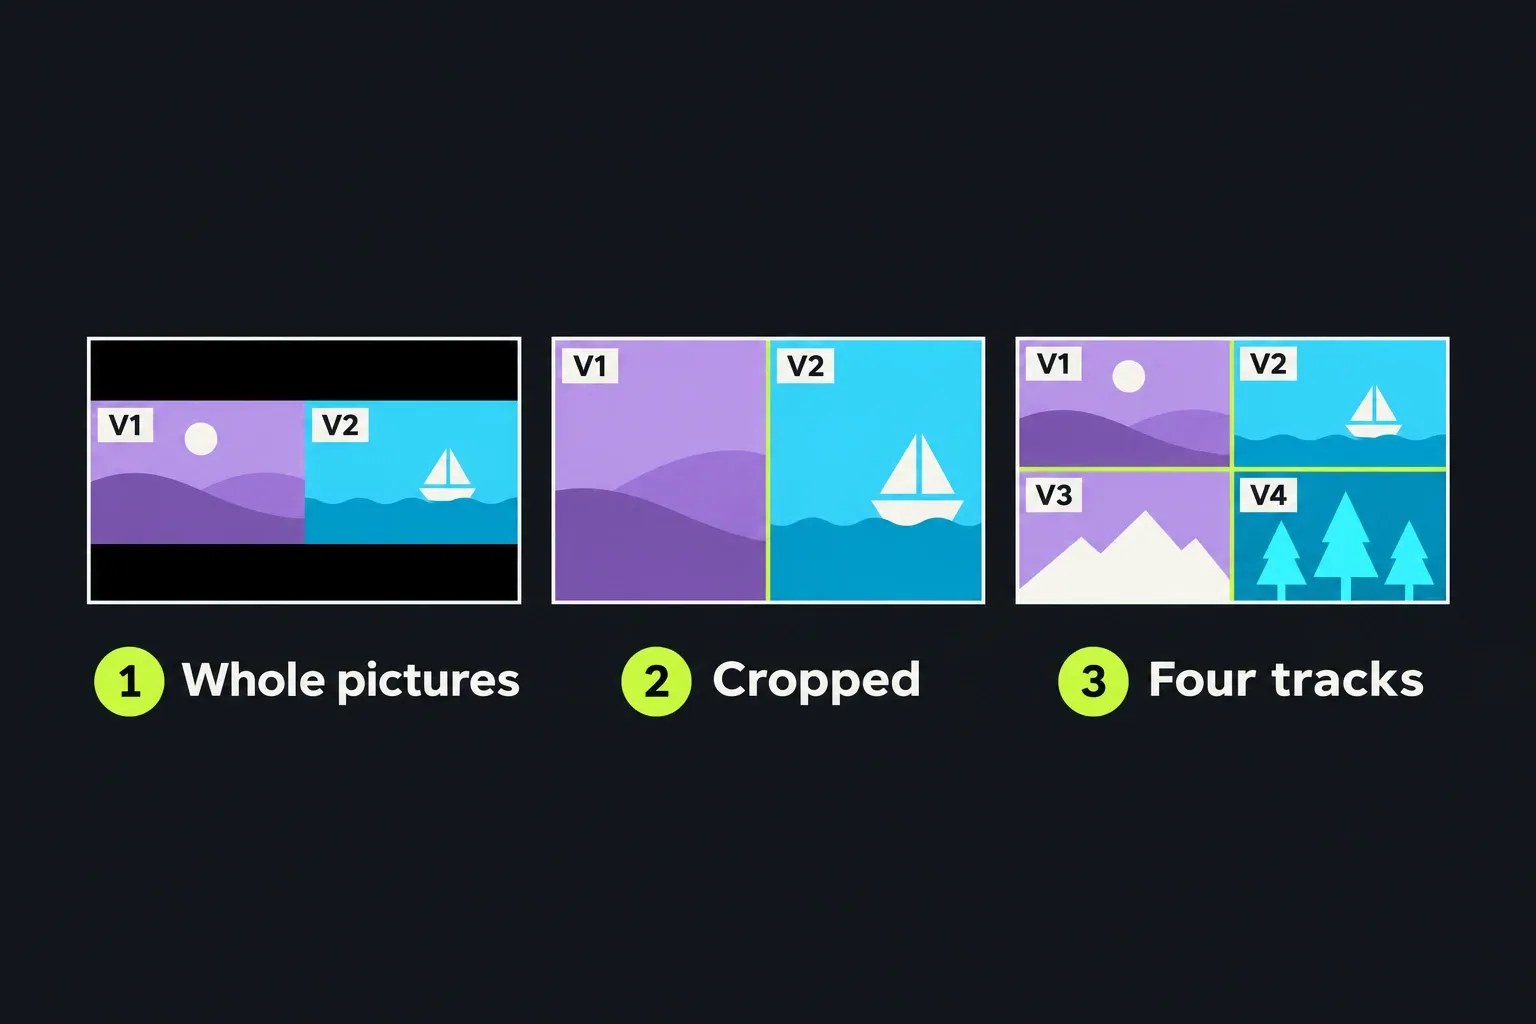
| Side by side, whole pictures | 2 | Scale 0.5 on both, shift one left and one right | Both full images, black bars above and below |
| Side by side, full frame | 2 | Scale 1, crop each to half its width, shift into place | No bars, but each shot loses its outer edges |
| Four-way grid | 4 | Scale 0.5 on each, one per quarter | Four whole pictures that fill the frame exactly |
| Nine-way grid | 9 | Scale about 0.333 on each | Nine small pictures, heavy to play back |
The bars in the first layout come from geometry, not a setting: two half-size 16:9 pictures fill the full width but only half the height. I'd crop for interviews and two-camera talk, where the subjects sit in the middle of each shot, and keep whole pictures when the edges carry information, such as two screen recordings.
Build one side, then use Copy Effects and Paste Effects to move its Transform 3D onto the other clip and change only the position. For a layout you'll reuse, Create template from segment effects saves the whole stack.
Grids have one trap. A 2024 user in the quad split-screen thread wanted to scale a whole quad split at once, and the moderator jwrl, who maintains the community effects library, explained that the Lightworks quad split is a template made of four separate transforms, so there's no master scale. Add one more transform on top, or use Quad split with transform, the free user effect he wrote in that thread as a single-effect replacement. Community effects install from the Effects settings panel on every plan, and the guide to Lightworks effects and plugins explains where to find them.
When only one picture shows
If both clips carry a transform and you still see only one of them, the effects are not being fed each other's picture. In the 2025 thread on showing two videos at once, jwrl's fix was to keep the effects folded into their clips, apply the transform to the V2 clip first and then to V1, so Lightworks routes the lower picture in as the background by itself. Fold is called Collapse Effects in 2026.1. If you've used Expand Effects to move the stack onto an FX track, you have to connect the inputs yourself in the Video Routing panel, which the effects overview in the Knowledge Base describes as rarely needed except when an effect takes a second input. The same thread points to community effects such as Triple transform and the Multiscreen set, which build a multi-picture layout in one effect.
What ten overlay reports point to
I grouped the ten Lightworks forum and Reddit results from the three searches behind this guide (adding a video track, picture in picture and split screen video) by the question each raises. The dated forum threads run from 2011 to 2025; the two Reddit items were readable only as search snippets. The last column gives the corresponding check in Lightworks 2026.1.
| Problem | Cases | Current Lightworks 2026.1 check |
|---|---|---|
| Can't find or create the extra track | 4 of 10 | Open a sequence rather than a source clip, then the track menu; in 2026.1 Track Options or a Drop Zone |
| Overlay shifted timing or sync | 2 of 10 | Replace instead of Insert; mark In and Out, park the playhead, then edit |
| Only one picture shows, or pieces won't arrange | 2 of 10 | Transform on each clip with effects folded; Video Routing only when expanded |
| Grid can't be scaled, or plays back slowly | 2 of 10 | Extra transform or a community effect for scale; proxies for playback |
Confirm the extra track exists, then use Replace to place the overlay before adjusting its effects. Scaling cannot recover a clip that was never placed on the intended track, and it will not undo an insert.
Playback load is the one problem that settings alone can't remove. In the 2023 thread on multiple pictures within a picture, hugly warned that a quad split-screen quadruples the computer resources needed to decode and preview, and called proxies more or less industry standard for that kind of edit. Four 1920 × 1080 streams do add up to the same raster area as one 3840 × 2160 UHD frame: 8,294,400 pixels per frame. That arithmetic describes the picture area only; codec, GOP, bit depth, frame rate and hardware decode path decide the actual decoding load. I'd judge a grid by its real playback behaviour and make proxies when the playhead stutters, rather than treating the pixel sum as a performance forecast.
The Knowledge Base page on performance lists the levers in the right order:
- Proxies first for playback. They're the main performance lever for a heavy grid. Before a master export, confirm that every required original is available and that the file points to the intended source: the current Lightworks proxy guidance warns that an export can fall back to whatever media is available when originals are offline. Free generates H.264 proxies up to 720p, which is plenty for a grid; the Lightworks proxy workflow guide walks through it.
- GPU Precision at 8-bit while you edit, 16-bit only for grading and the final render.
- Fast local storage. Several streams at once need sustained disk throughput, so a local SSD beats a USB drive or a network share.
A stutter on the first play that vanishes on the second is normal caching, not a fault. If playback stays slow, the slow playback checks isolate the cause.
Overlay problems and fixes
| Symptom | Likely cause | Fix |
|---|---|---|
| No add-track command | A source clip is open, not a sequence | Open the sequence, then Track Options |
| Main footage disappeared | A full-size clip on V2 covers V1 | Scale or crop the V2 clip |
| Overlay never appears | V2's Monitor button is off (shown red), or the clip sits on V1 under the main shot | Turn the track back on; a hidden track is also left out of the export |
| Everything after the overlay moved later | The clip went in as an insert | Undo, target V2, use Replace |
| Effect landed on the wrong clip | Double-click and Apply follow track targets | Drag the effect onto the clip itself |
| Only one of two transformed clips shows | Routing between the two effects | Collapse Effects, apply to V2 then V1, or wire it in Video Routing |
| Logo has a white or black box | The image has no transparency | Save the logo as PNG with an alpha channel |
| Grid stutters on playback | Several streams to decode at once | Make proxies, set GPU Precision to 8-bit |
If the whole picture goes black rather than one layer, the black video diagnosis separates timeline, visibility and export causes. For cropping a single shot, or reshaping a whole edit for vertical delivery with Reframe, the crop, resize and reframe guide goes deeper than this page.
Verdict
Overlays in Lightworks come down to one rule and one effect: whatever sits on the higher track covers the lower one, and Transform 3D decides how much of it covers. In 2026.1 the track side got easier, with Track Options and Drop Zones replacing the hunt through right-click menus that fills older forum threads. I'd build every picture in picture and split screen with Replace onto its own track plus Transform 3D, because that keeps the edit's timing intact and works on the Free plan with no presets or plugins. Reach for community effects only for grids you'll repeat, and make proxies when multi-stream playback starts to drag. Before delivery, restore the intended Monitor and solo states, then play the finished file outside Lightworks. Check the overlay's entrance, exit and position, and listen for any source audio you meant to leave out. The Lightworks keyboard shortcuts speed up the mark, park and replace routine once it becomes a habit.