
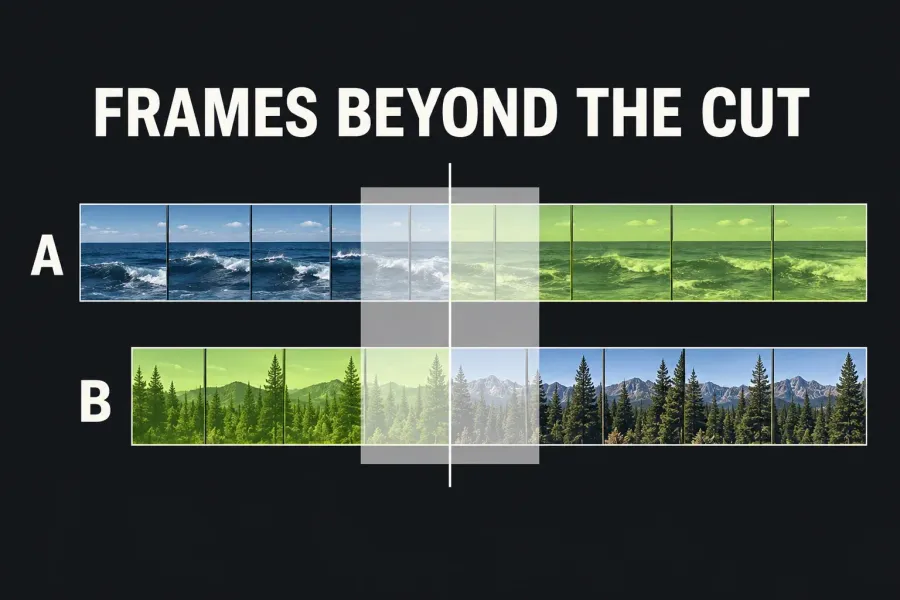
If Lightworks adds a dissolve but makes it shorter than requested, compare the actual effect length with the unused source frames around the cut. The current transition guide describes reducing the duration to fit insufficient spare material, with a notification. A long shot on the timeline can still have almost no spare frames at the end that matters.
Start with the placed transition, both source boundaries and the intended timing. The steps follow LWKS documentation, so use the named controls where they match your build; the V2025.2 retiming case near the end carries its own version condition.
Check the actual transition, not only the request
At the intended join, note the length you asked for, the resulting length and where the effect starts and ends relative to the cut. Check its alignment too. A shorter effect that exists on the timeline is a different starting point from a transition that was refused.
LWKS documents adjusting duration through the transition's timeline edge or its length settings. Read the resulting value and inspect the span after an adjustment. Typing a desired length does not establish that both sources can supply the proposed blend.
Find the spare frames in both sources
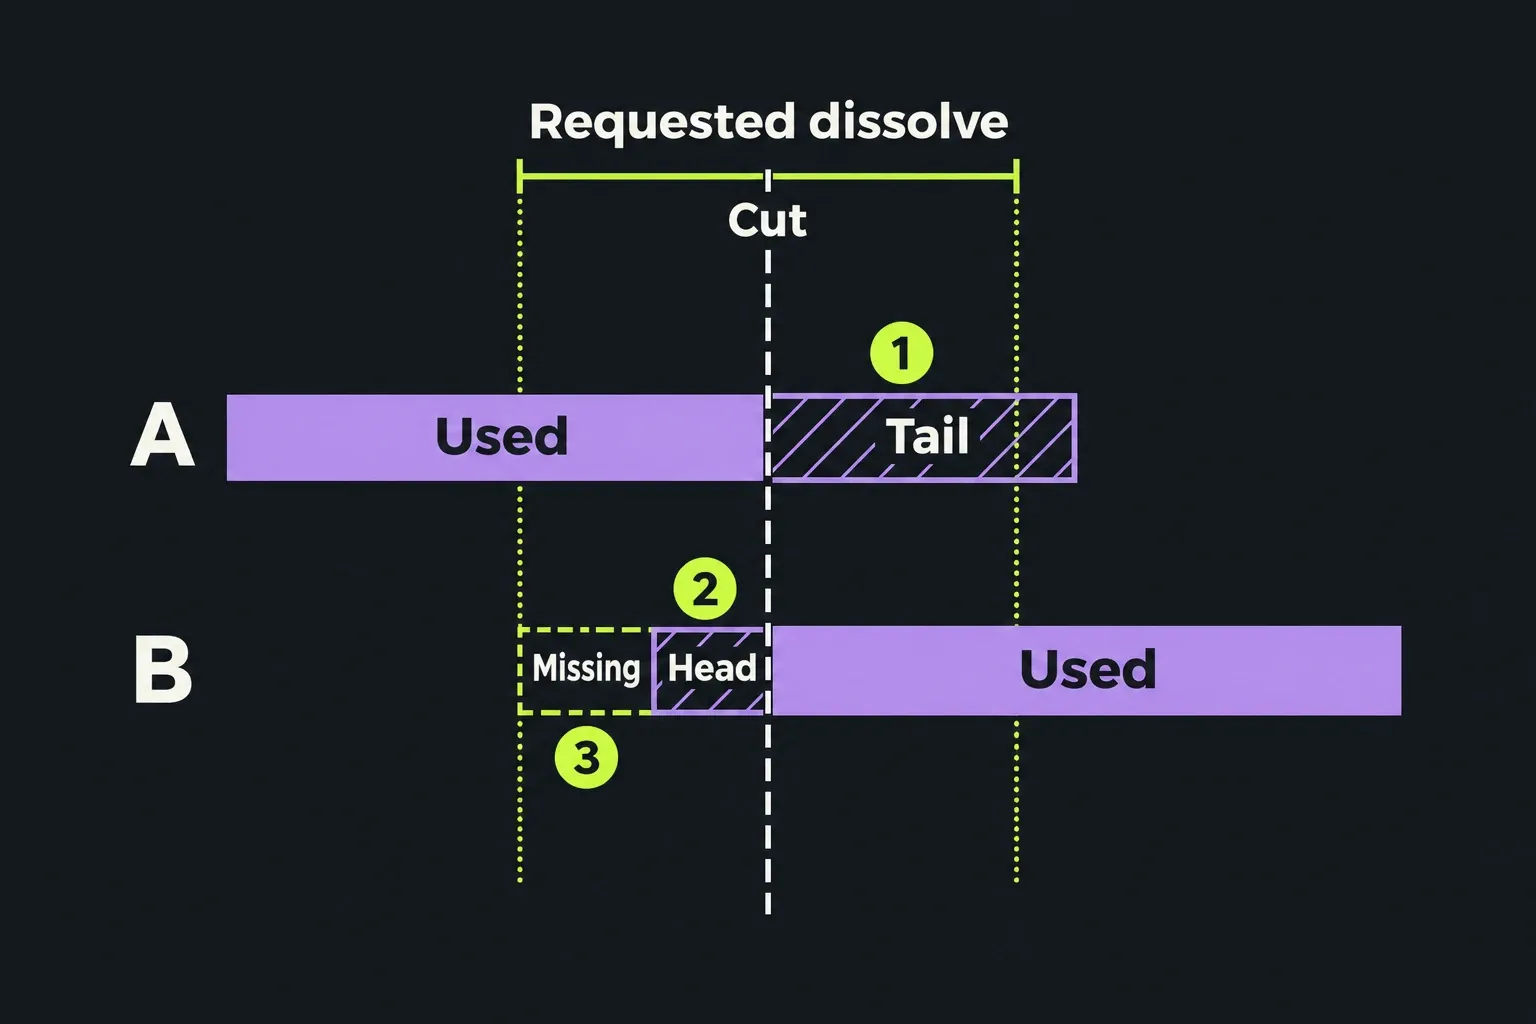
Here, handles means unused source frames, not the small controls you drag in an interface. For a blend using the original source timing, the outgoing clip needs material beyond its used Out, and the incoming clip needs material before its used In. Those extra frames let both pictures exist during the overlap.
- Identify the actual outgoing and incoming sources. Work from the two segments at this cut. Do not substitute another take with a similar name or assume a shorter subclip exposes everything in the original recording.
- Open each source for inspection. You can double-click its tile or list entry to load it into the source viewer. The ends of the source-viewer scrub bar represent that clip's start and end. Compare those boundaries with the portion already used in the sequence.
- Check the outgoing tail. Look beyond the source frame used at the outgoing segment's end. Is there recorded material left, and is its picture suitable for the blend? A minute-long used segment ending at the recording's last frame has no recorded tail beyond that endpoint.
- Check the incoming head. Look before the source frame used at the incoming segment's start. Starting the used selection at the recording's first frame leaves no earlier recorded head, regardless of how long the rest of that shot lasts.
If the source is difficult to identify, Match frame loads the sequence segment's source at the same frame. Use the command as mapped in your build; there is no need to guess a shortcut. Loading a source is an inspection step. Changing its marks alone does not revise the segment already edited into the sequence.
Compare the request with native source coverage
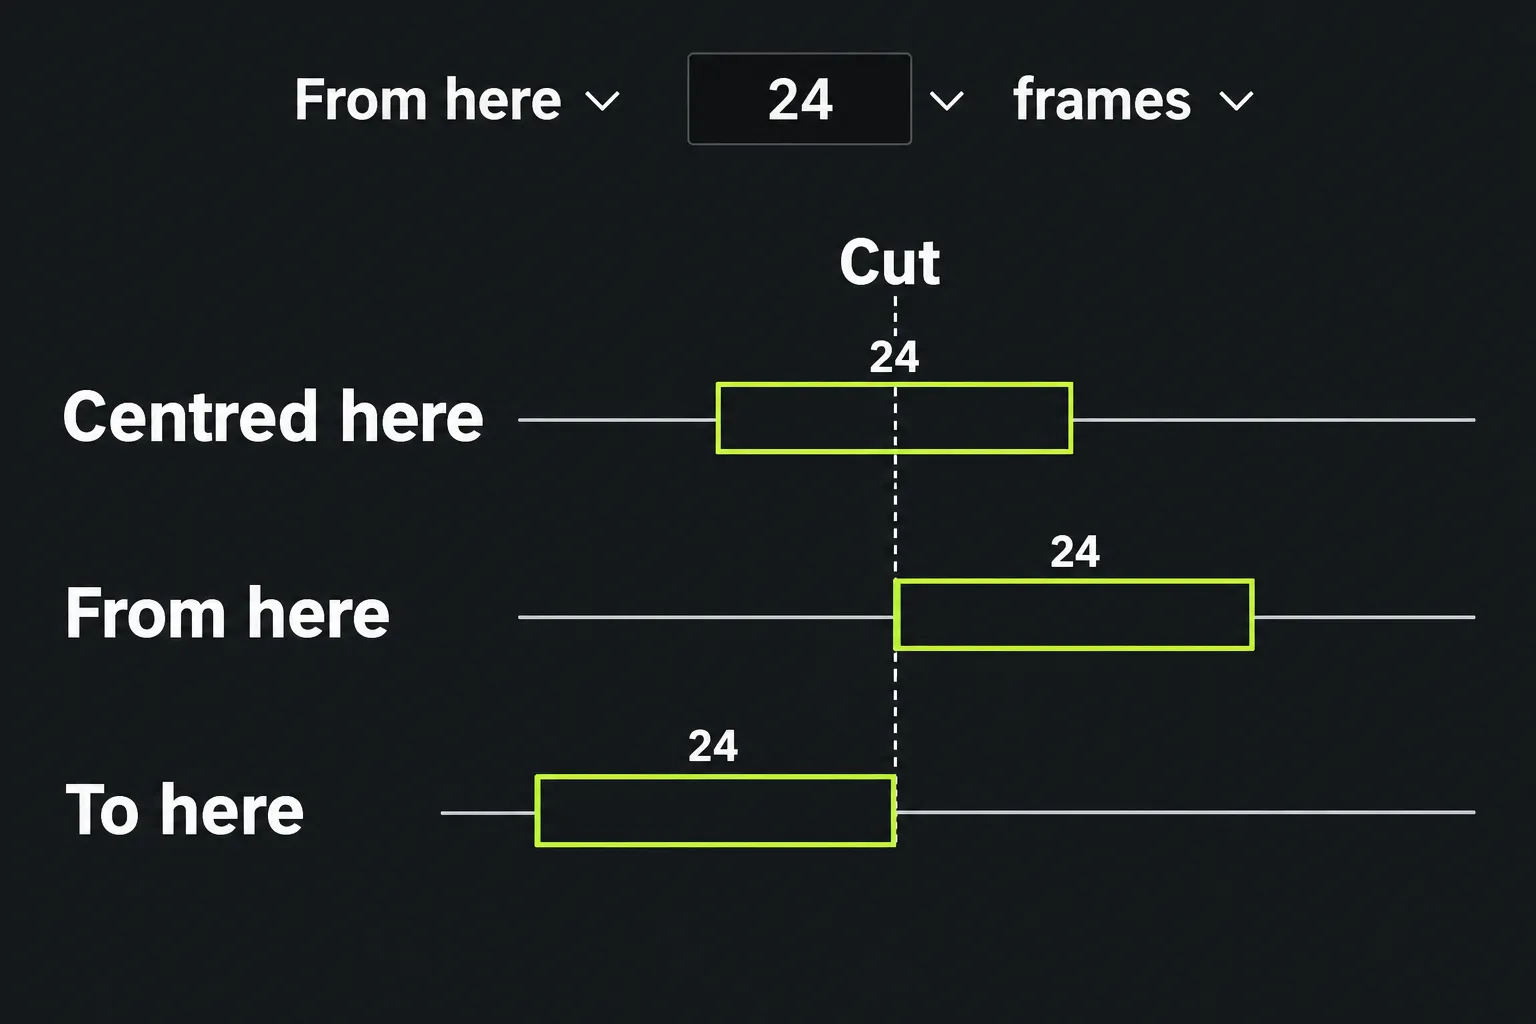
For example, take a 24-frame Centred here dissolve, with straightforward source playback and no retiming. Its requested span runs 12 frames before and 12 frames after the cut. Covering that span needs 12 unused incoming frames before In and 12 unused outgoing frames after Out.
If the outgoing tail has 12 frames but the incoming head has only eight, the requested span lacks four incoming source frames, so that source selection cannot cover it in full. Frame counts alone won't give the exact shorter duration Lightworks picks; the guide doesn't specify a universal reduction or rounding algorithm. Read the length of the effect it creates instead.
Choose length and alignment with the cut in mind
I'd keep a shorter dissolve whenever its pace and picture already suit the scene. Extending it merely to reach a preset can expose an unwanted expression, unfinished camera movement or a moment deliberately left out of the edit. Spare frames have to work editorially as well as exist in the source.
If placement is the problem, the documented alignment choices position the effect relative to the cut:
| Alignment | Requested placement |
|---|---|
| Centred here | Straddles the cut, half before and half after |
| From here | Runs forward from the cut |
| To here | Runs backward to the cut |
With uneven spare material I'd try From here or To here before trimming, since alignment leaves the selections alone. Moving the span doesn't create recorded frames, so compare both sources with the new start and end before expecting the requested duration to fit. Recheck the accepted length afterwards.
If the requested duration is essential, consider a different source selection that leaves sufficient material on both sides. LWKS suggests trimming the selections shorter to free frames before adding the transition again. Decide first which words, action and shot timing must survive. Shortening or repositioning a segment can change the edit and its sync relationships; there is no safe fixed number of frames to trim from every cut.
When changing the selected content is necessary, use the cut-and-trim workflow for that editing operation, then reassess the handles. Re-marking the source viewer is not a substitute for deliberately changing the existing sequence.
When overlap comes from retiming
Recorded spare frames are not the only behaviour described in LWKS material. In the community FAQ's V2025.2 note, moderator briandrys describes automatically creating overlap by slowing existing media within the proposed transition by 50% when full overlap is unavailable. The same note says the media must meet criteria and otherwise overlap must be created manually, but it does not specify those criteria.
That version-specific account doesn't cover every build, creation method or no-handle case. Slowing existing material doesn't supply additional recorded action. If the transition uses retimed material, inspect movement through the blend and check timing and sound sync; successful creation doesn't mean genuine spare frames were found. I wouldn't chase an automatic option whose eligibility the note leaves unspecified.
The current transition guide also describes a no-room refusal. Neither that wording nor the retiming note sets a rule for every zero-handle cut, whether failure or retiming, so diagnose the result in your build.
Add again and inspect the complete join
Once you have chosen a suitable length, alignment and source selection, the documented cut-point Add procedure is:
- Use the Edit layout and right-click the intended cut between the two clips.
- Choose Transitions and the required type, such as Dissolve.
- Choose the alignment and set the length.
- Click Add, then inspect the actual duration and span again.
I'd stick with the cut-point Add procedure above, because a drag-and-drop route may not handle the transition the same way. Watch from before the transition starts until after it ends. Check the outgoing exit, incoming entry, blend pace, movement and sound sync, including any words or action near the boundaries. An accepted effect can still be wrong for the scene.
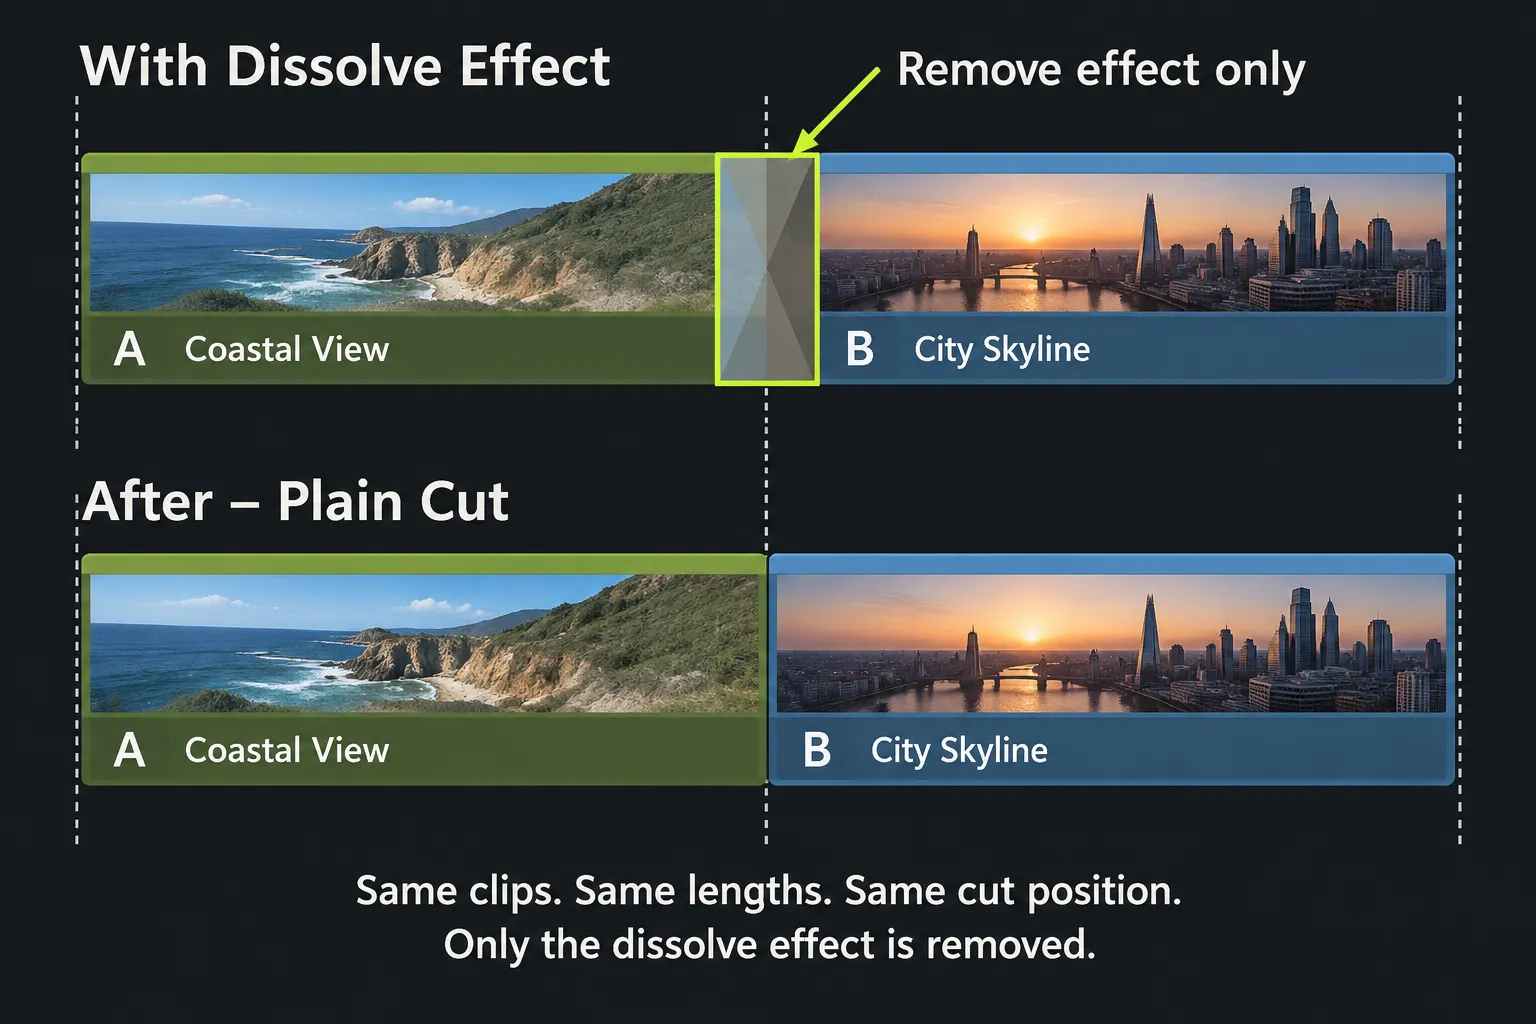
If the dissolve weakens the moment, select and delete the transition itself, or remove it through its context menu. Deleting only that effect returns the join to a plain cut without changing the clips. Do not delete a marked timeline range or either source clip as a transition-removal shortcut.
If Add is refused rather than shortened, follow the transition-won't-add diagnosis. If the intended picture is one shot fading in or out, choose a single-clip fade instead: that is a different operation from blending these two shots across their join.