
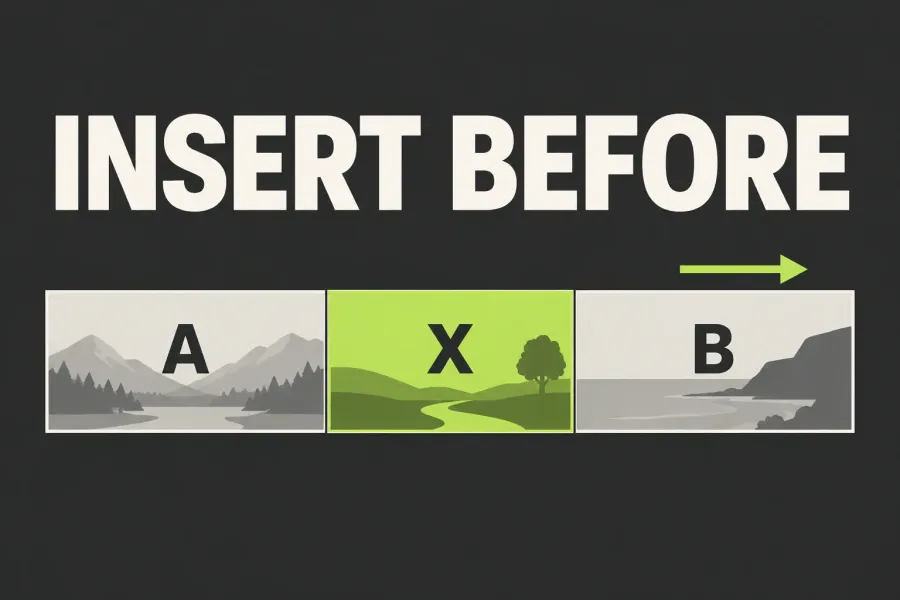
To insert a clip before another shot in Lightworks, choose that shot's start in the sequence, mark it as the destination In point, and use Insert with your source range prepared. For “after”, choose the shot's end. Insert makes room by moving existing material later; Replace overwrites in place. Check the tracks that receive the clip and the tracks that must follow before adding that time.
I prefer a marked source and one explicit destination for this job. It avoids dragging neighbours aside to make a gap, and it gives you three things to verify before the edit: the footage, its length and its landing point. If you want a cutaway over dialogue without adding duration, use Replace on a picture track above the existing shot instead.
Separate the source range from the destination
The source viewer holds the clip you want to add; the sequence viewer shows the edit receiving it. In the current viewer layout, their header icons distinguish source from sequence: blue for source and red for sequence. The viewers work independently, even when a stacked layout gives them the same screen area.
A source In and Out choose what arrives. The sequence destination chooses where it arrives. Parking at a source clip's end does not move the sequence's playhead. Put keyboard focus on the viewer or timeline you intend to mark before using a marking key.
Suppose an eight-second sequence has shot A from 0–4 seconds and shot B from 4–8. You want to add a two-second reaction X. Inserting at 4 seconds produces A–X–B: X occupies 4–6, and B moves to 6–10. Inserting at B's end produces A–B–X instead.
The three-point editing model uses source In, source Out and sequence In for that first route. An old sequence mark can therefore matter even if you have moved the playhead. Clear marks you no longer want, choose the boundary, and set just the destination In; don't leave an old destination range in charge of the next edit.
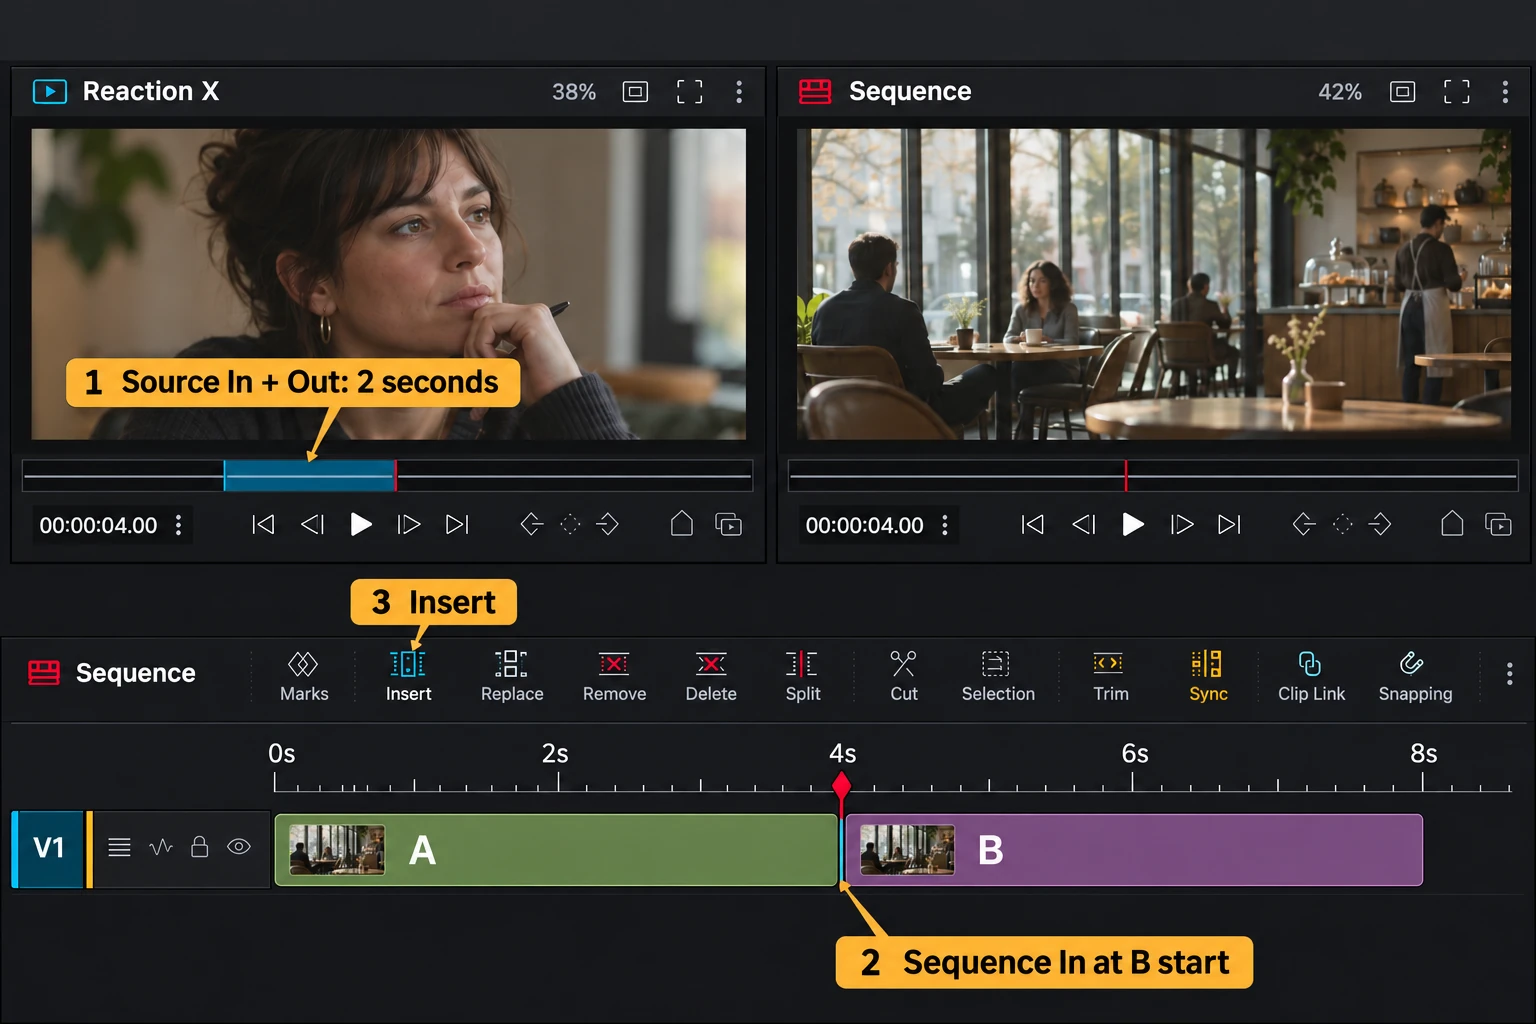
You can also use mark and park: mark one end of the source section and leave its playhead at the other. I prefer explicit source In and Out while diagnosing wrong-order inserts because the chosen range remains clear when you return to the sequence.
Check which tracks receive and follow the insert
Source enablement chooses what is included; sequence targeting chooses where it lands. Include the source picture and sound you want. Muting a source's preview does not exclude that sound from the edit. For a picture-only addition, explicitly target the source picture rather than relying on what you can hear.
On the sequence, the full-height V1/A1 buttons are Track Targets. With none lit, the default includes every track and source material lands from the top. Turning off the last target restores that default; it does not mean “edit nothing”. Shift-click a Track Target to reset old targeting, then set the intended destinations. For the picture-only example on V1, make V1 the explicit destination and confirm no audio target is lit.
Check that the receiving tracks exist and are editable. The current track controls include Auto Add Tracks to add enough tracks for source material. If a source has several audio channels, inspect where each will land instead of assuming a stereo layout from the waveform alone.
Receiving footage and following a timing change are different jobs. With Sync on and the intended unlocked tracks in the sync group, Insert pads nonreceiving tracks with black so their later material stays aligned. On an audio track, that black is silence. An untargeted dialogue track can therefore move and gain silence even though you inserted picture only. The Insert and sync rules also leave tracks outside the sync group in place; with Sync off, untargeted tracks stay put.
The slim amber Track Sync strips sit beside the wide target buttons. With no trim open and Sync on, every unlocked track's strip is lit. They show sync participation, not a destination for incoming footage. Show Track Sync Indicators can hide them, so check that setting if the strips are missing.
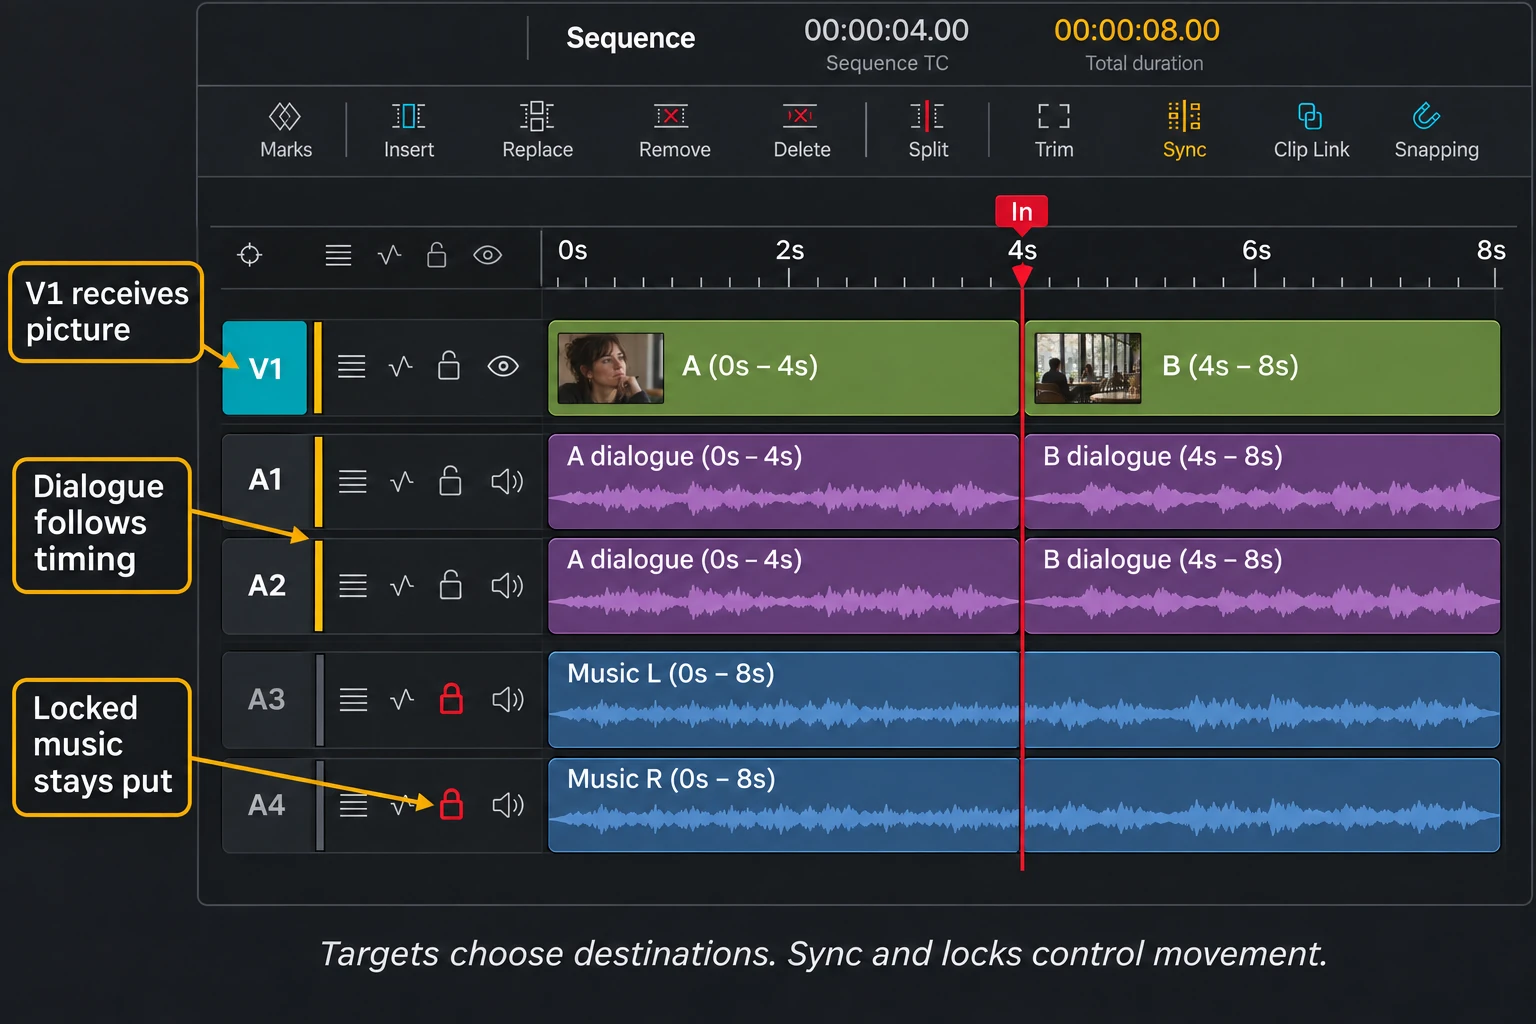
Lock excludes a track from edits and sync movement. A locked music bed keeps its position, which can be useful, but a locked dialogue track will not follow B. Mute is not that protection. Keep Keyframes off on a track you intend to protect: turning Keyframes on unlocks it.
If the sound should continue under X without a pause or timing change, I'd reconsider Insert before touching the controls. Replace is the operation that keeps the sequence length; Insert deliberately adds time. Decide that relationship first, then use the tracks and locks to carry it out.
Insert the marked source at an exact boundary
On an important edit, preserve a rollback point before changing its timing. Lightworks saves continuously and has no Save command, so autosave is not a separate preserved version. A project archive can hold logs and media, or logs alone with media supplied separately.
- Open the intended sequence. Its viewer and timeline must show the edit you mean to change. Close an open trim before using navigation keys: Tab joins it. Don't press Tab again after it is closed, because that key can reopen the last trim.
- Prepare the source range. Double-click X in the Content Manager to open it in the source viewer. Focus that source, press P to unmark old marks, find the desired start and press I, then find the end and press O. Review the marked section. These are the factory Unmark, Mark In and Mark Out assignments; use your current bindings if you changed them.
- Set one destination. Focus the sequence and press P to clear its old marks. Choose B's start for “before”, or B's end for “after”, then press I there. Leave no sequence Out mark for this route. A/S are the factory previous-cut/next-cut keys; inspect the visible boundary instead of assuming the next cut is the end of the whole edit.
- Verify tracks and timing. Include the source tracks you need and set their receiving tracks. For the picture-only V1 example, only source picture is included and V1 is the explicit sequence destination. Set Sync and inspect locks according to which existing tracks should follow. Remember that unlit targets are the automatic default, not an exclusion.
- Click Insert. Use the named Insert control for the sequence rather than Replace or a clipboard command. The Edit timeline toolbar contains Insert beside the other edit operations. In a narrow window, tool groups can collapse into menus. If the edit tools are hidden, check Show Edit Tools in Timeline settings; Effects and Audio timelines keep those tools off.
- Inspect the result before another edit. Check X, both new joins and the shifted tracks. The current Quick Start describes the playhead moving to the inserted range's end. Clear and set the next destination deliberately anyway; a leftover mark or a different operation is enough reason to check the actual position.
For an append, choose the end of the intended last shot and set the destination there. The factory ; command jumps to the sequence end, while H jumps to its start. A long music or subtitle tail can put the sequence end beyond your last picture, so inspect it before appending.
Check the order, duration and sound
In the two-second example, X should occupy 4–6 seconds and B should retain its original footage at 6–10. The receiving picture track grows by two seconds. Unlocked, synced dialogue that received no source audio gains two seconds of silence at 4–6 and moves its later sound with B. A locked music pair stays at its old times. Those are different intended outcomes; check each one.
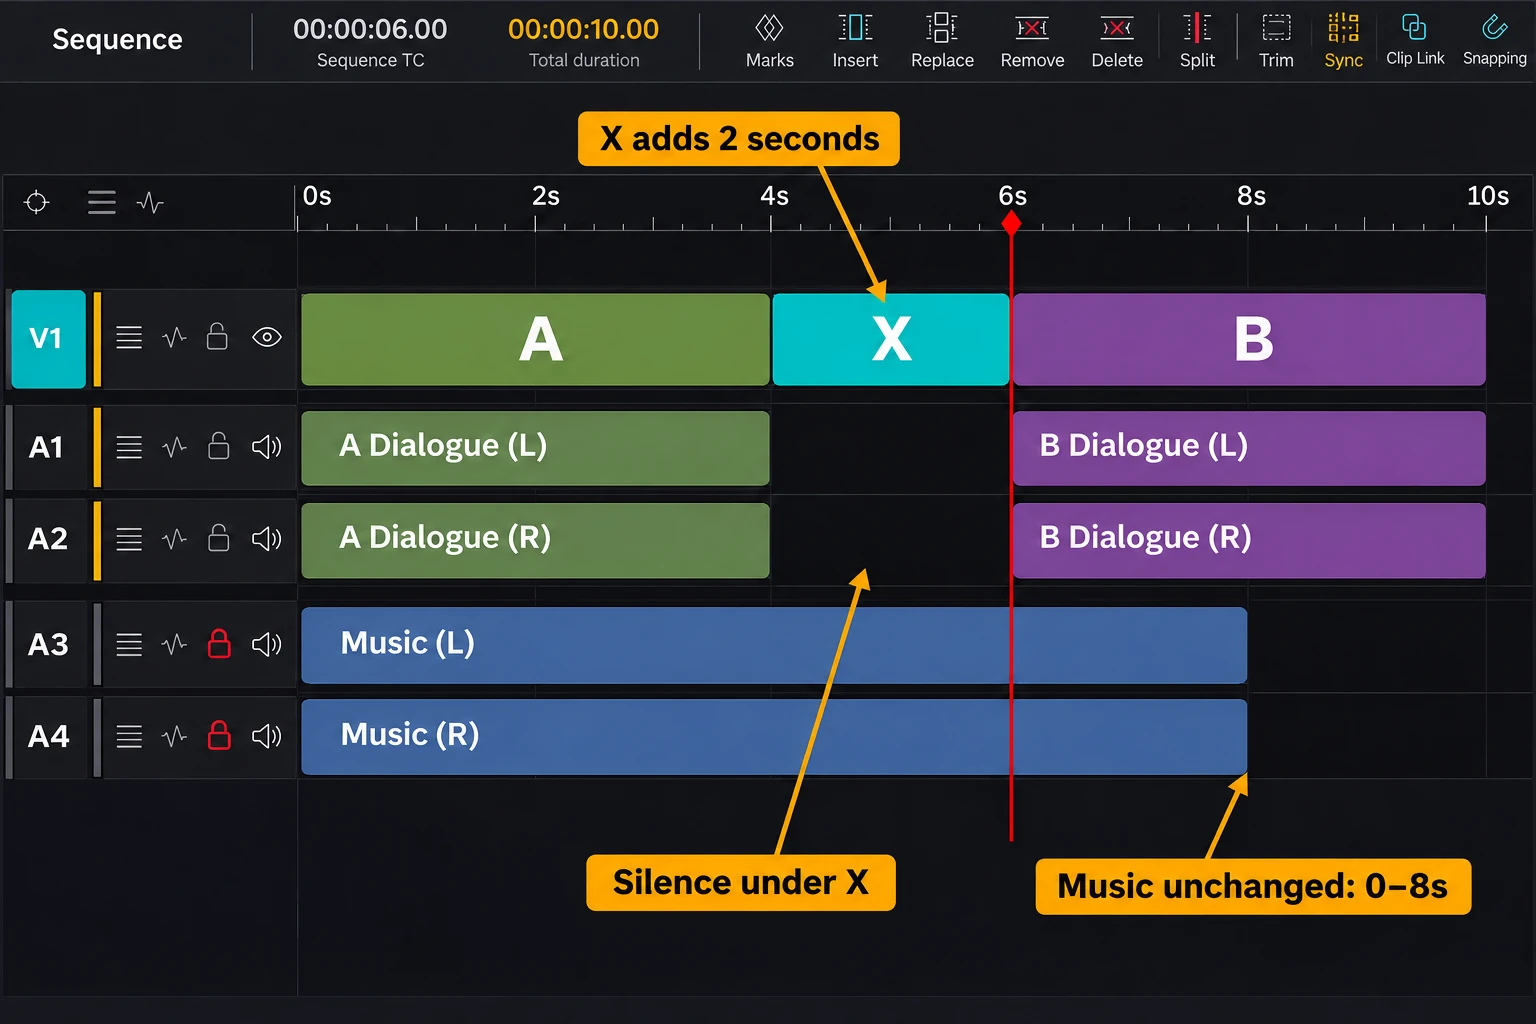
- Order and range: play A–X and X–B. Confirm X contains the marked source section and B's beginning has not been overwritten.
- Sound: listen across both joins. Is silence under X intentional? Did wanted source audio arrive? Does the dialogue still match B? Untargeted and locked audio need different checks.
- Downstream relationships: inspect a recognisable later cue, title or subtitle. Correct picture order at the insert does not prove every track followed correctly.
- The next operation: check the actual playhead, sequence marks, source range, targets, Sync and locks before repeating Insert.
If the result is wrong and this is still your latest change, Undo with Ctrl/Cmd+Z. Recheck the destination and participation before trying again. I wouldn't repair one unexplained insert by dragging several downstream clips into place; that makes the original timing error harder to isolate.
If the next insert lands in the wrong place
X appears before the wrong shot: inspect the sequence In mark as well as its playhead. Clear the sequence marks, navigate to the intended boundary and set one fresh In. Repositioning the source playhead changes a source range; it does not choose the sequence destination.
The added section is the wrong length: check both viewers' marks. The explicit route here uses two source marks and one sequence In. A marked sequence range with a source In is a different three-point setup that fills the destination range. Use one deliberate setup rather than combining leftover marks from several edits.
Existing footage vanished: check whether you used Replace. It overwrites in place; Insert makes space. Undo the mismatch before adding more material.
Picture moved but the sound did not: check Sync, the sync group and audio locks. If the sound moved but now contains a pause, that may be Insert's black padding on a nonreceiving audio track. Use independent picture trimming or an in-place cutaway when that is the actual editing task; neither is the same as adding two seconds to the sequence.
Pasted material ignores your new targets: clipboard pastes return to the tracks the material came from. Targeting does not redirect them; Lock can exclude a track. The factory Ctrl/Cmd+V and F are Clipboard Insert & Next, which paste and advance the playhead. They are not substitutes for choosing a new source in the source viewer.
You only want empty space: the current clip-or-gap right-click menu has Insert gap, which inserts five seconds of black and leaves locked tracks alone. That's a separate task from inserting X; you do not need to make or delete a temporary clip just to add real footage.
My default is one checked source range, one explicit destination and one reviewed Insert. Once its picture, sound and downstream timing are right, choose the next destination rather than relying on where the previous operation left the marker.